The Guitar Player's Resource
Harp harmonics never fail to immediately grab the attention of those who hear you play them, leaving them spellbound by what they just heard. This technique produces such a unique sound, alien to what you would normally expect to hear from a guitar, that you can't help but be amazed by their awesome sound.
Watch the first part of the video above to hear harp harmonics in action. When I first heard this technique my mind was totally blown. I knew I just had to learn how to do these myself, which opened up a whole new world of sound to my guitar playing.
Harp harmonics are no guitar 'trick'. They are very musical. Listen to players such as Chet Atkins, Lenny Breau, and Tommy Emmanuel to hear just what's possible when integrating this technique into your guitar playing.
In today's article, I am going to take you through, step by step, exactly what you need to do to learn harp harmonics. By the end of it, you will have a rock solid foundation with which to create using this awesome technique.
Carefully read this article and watch the video that accompanies it to build the technique required for playing harp harmonics. It's highly likely you've never done anything like this on your guitar before, so be patient and get excited about the whole new world of sound that is awaiting you!
Once we have run through the technique as a whole of playing harp harmonics, you will understand each approach outlined below a little more and no doubt will favour one over the others. For now just understand there are three ways you can play your harp harmonics. I use all three depending on the context but favour the thumb pick overall. Below is a comparison of each approach (you can skip down to the next section 'How To Play Harmonics' and come back to this part later, after you have the basic technique down if you prefer).
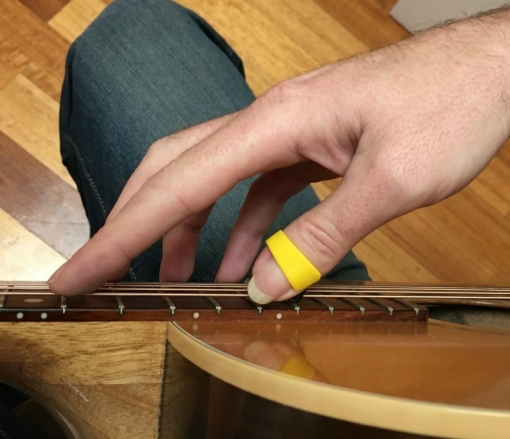
1. Thumb Pick:
Your harmonics will resonate more, and have greater sustain when using a thumb pick. You will also have use of your middle, ring, and pinky fingers to play regular notes, which is not the case when using a plectrum. Of course, you may not use a thumb pick yourself, and is why we have more than one approach to choose from when playing harp harmonics.
2. Bare Thumb:
Your harmonics will resonate more, and have greater sustain when using a thumb pick. You will also have use of your middle, ring, and pinky fingers to play regular notes, which is not the case when using a plectrum. Of course, you may not use a thumb pick yourself, and is why we have more than one approach to choose from when playing harp harmonics.
3. Flat Pick (Plectrum):
As mentioned above, you have one less finger to use for playing regular notes when adopting the plectrum approach. This is because your middle finger, along with the thumb, is busy gripping the plectrum while your index finger sounds the harmonic. While this is a slight limitation, you can still create awesome harp harmonics using a pick. A big advantage of this approach is that it integrates nicely into regular plectrum based playing.
Despite this, I am going to be using the bare thumb/thumb pick approach in today's article.
Whichever approach you go with above, the harmonics are always sounded using your index finger. Let's begin with open string harmonics which are located at the 12th fret. This will allow you to focus solely on your picking hand. We will bring the fretting hand into the picture shortly.
Harmonics are sounded by placing the tip of the index finger directly over the top of the fret, not in-between as you do for regular playing. So take your index finger and place it directly over the top of the 12th fret on the 6th string of your guitar.
You should barley be touching the string, with no pressure whatsoever being applied by the index finger. If you push down at all, the harmonic won't sound.
Once you have your index finger in this position, use the thumb of the same hand (ie. the picking hand) and pluck the string your index finger is touching, from behind. Provided your index finger is just touching the string, directly over the 12th fret, you will hear a bell like harmonic.
When sounding your harmonics, keep the following two things in mind:
1.The index finger sounding the harmonic needs to be straight at all times. Don't bend it.
2.To prevent your harmonic from suffocating, meaning it doesn't resonate well at all, maintain a good distance between your index finger and thumb that are sounding the harmonic. Avoid having them too close together.
To get this part of the technique comfortable, practice sounding each of the open string harmonics at the 12th fret. Take your time, this is quite different to anything you've done on the guitar before:'

I have used a colon (:) symbol next to each note to indicate they are played as harmonics.
To drastically increase the possibilities of your harmonics, we will now take the technique we have learned and apply it to fretted notes.
To do this, you need to maintain a distance of 12 frets between the index finger sounding the harmonic, and the finger that is fretting the note. Any more or less and the harmonics won't sound.
Try the following:
Bar all six strings at the 3rd fret of your guitar and apply the technique of sounding harmonics with your index finger and thumb, as you did at the 12th fret.
However, this time you need to place your index finger over the 15th fret because your fretting hand is at the 3rd fret (3 + 12 = 15). Remember, you always need to maintain a distance of 12 frets between your harmonic notes and fretted notes.
The chord your fretting hand is forming here is a Gm11:
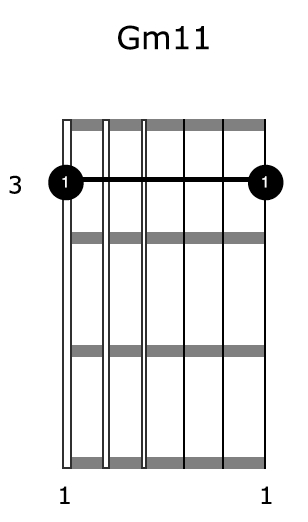
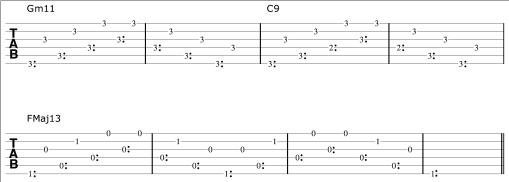
Here are the harmonics of the Gm11 chord:

Remember to make sure your index finger, sounding the harmonic, and thumb plucking the string aren't too close together. Keep your index finger straight and apply the lightest of light touches when sounding your harmonics.
Here is another example of applying the harmonic technique.
We'll use this C9 chord shape:

Normally this C9 chord is fretted from the 5th string. I am including the 6th string in this case so that we can extend the harmonics being applied.
All we need to do is track/visualise the shape of this chord exactly 12 frets higher up on the fretboard:

All harmonics are sounded at the 15th fret in the example above except for the 4th string. This harmonic is sounded at the 14th fret.
Why?
Because we always need to maintain a distance of 12 frets between our fretted note and harmonic note. The C9 chord has a note at the 2nd fret on the 4th string. Adding 12 means the harmonic on this string needs to be sounded at the 14th fret (2 + 12 = 14).
This is where our visualisation skills come into play. If you can visualise the exact shape of the chord your fretting hand is forming, 12 frets higher up the fretboard, you'll be good to go. This does get a lot easier to do with just a little practice.
Let's go one more time.
Here is an FMaj13 chord shape:
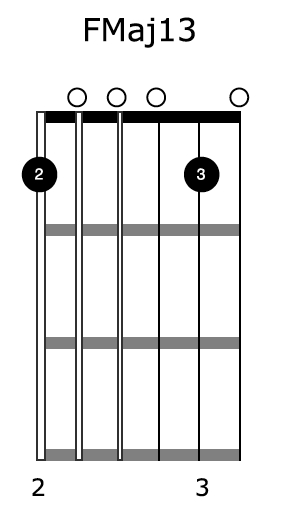
This chord contains both fretted and open notes.
Here it is with harmonics being applied:

Now that you have the foundation of the harp harmonic technique, we can add the final touch which makes all the difference. Taking the ring finger of your picking hand, you are going to add regular notes in-between the harmonics you sound with your index finger.
This will naturally feel very uncomfortable at first, that's normal. With practice it will get easier, so don't be discouraged.
Here is a very common harp arpeggio pattern, applied to the harmonics at the 12th fret to get you started:

In the example above you are alternating 12th fret harmonics with open strings to create an awesome cascading like effect of harmonics and regular notes. Now we're cooking!
Once you have this pattern going, you can apply it to any chord you like, just remember:
Keep a distance of 12 frets at all times between the notes you fret and the harmonics your index finger is sounding.
Keep track of/visualise the chord you are fretting 12 frets higher up the fretboard, so you can accurately sound the harmonics with your index finger.
Let's take our harp arpeggio pattern and apply it to each of the chords we were using for the harmonics earlier:
Gm11:

C9:

FMAJ13:

In each example above, your picking hand is doing the exact same pattern. What changes is where you are sounding the harmonics of each chord.
We can take this further by creating a harp harmonic progression. Simply connect the chords together like so:
This is only the beginning. What you can do with harp harmonics is truly mind blowing! Get the foundation of the technique down, and you will change the way you play your guitar from this day onward.
Create breathtaking chord progressions using harp harmonics on your acoustic guitar with this ebook/video download.
Specializing in online acoustic guitar lessons, Simon Candy is based in Melbourne, Australia where he runs his own guitar school.
