The Star Of The County Down

The first time I heard "The Star Of The County Down" (which can be heard on my 2001 CD "Refuge") was several years ago on a PBS special entitled "Celtic Harpestry". I was so moved by the performance of this hauntingly beautiful melody, that I had to arrange it for the guitar. The song is an Irish ballad about a man's desire to be with Rosie McCann from the County Down. My arrangement is for solo fingerstyle guitar. It could be played on steel string as well as nylon string guitar. Before I discuss the techniques used to play the piece, I'll clear up the hieroglyphics found on the music.

pic

pic

What Am I Looking At?

  1. I have presented the piece in both standard notation and tab * Note - The idea of tab is not a creation of the 21st century. It dates back hundreds of years ago and was the method that lutenists used to notate their music.
  2. Suggested metronome marking pic
  3. Time signature is 3/4, also known as waltz time.
  4. A number next to a note indicates the finger of the left hand used to play the note. Example: 1 is index, 2 is middle, 3 is ring, 4 is pinky.
  5. A circled number indicates the string on which the note should be played.
  6. C3 (Example: measure 4) indicates a full bar on the 3rd fret.
  7. pic 
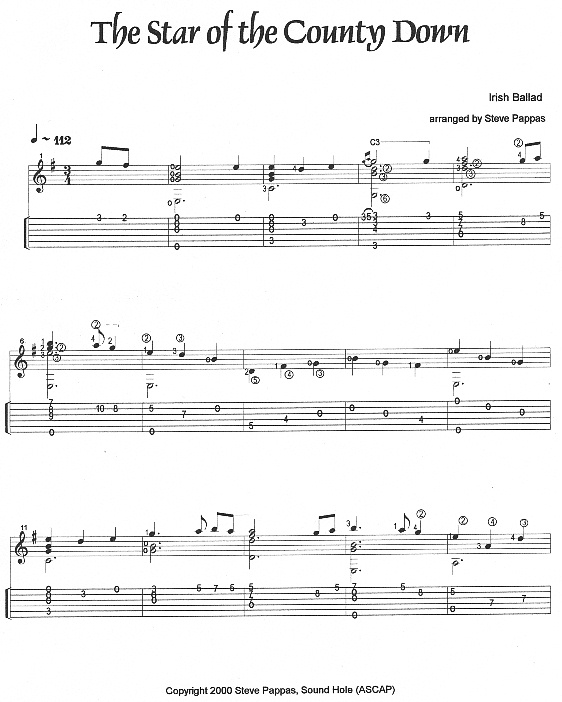
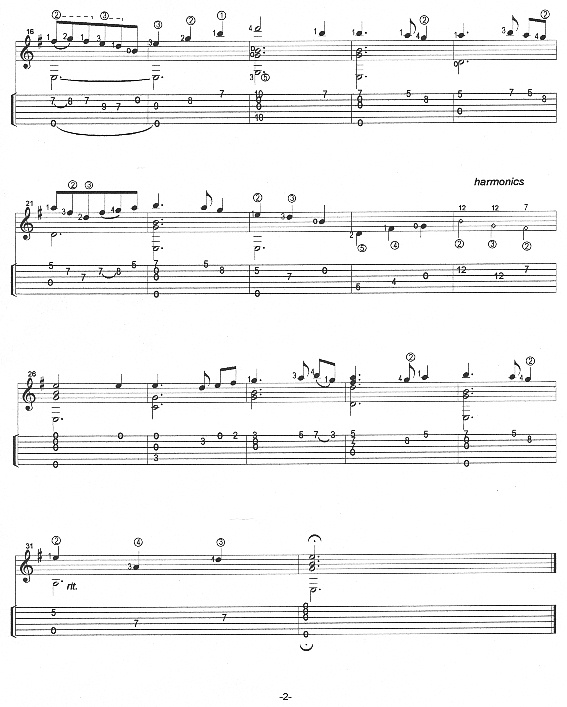
represents a hammer-on or a pull-off (Example: measure 16).
  8. There is a tie in the bass in measure 16. Play the bass note once and allow it to ring for six beats.
  9. The diamond shaped notes in measure 25 are harmonics. The number on the top of the note indicates the fret and the number below in the circle, the string.
  10. There is a hold sign above the last chord of the piece which is E minor (also the key of the piece).

Technique

  1. The piece is to be plucked with the fingers of the right hand. Generally, the thumb will play strings 6 - 5 - 4 or E - A - D, but there are exceptions to these rules. The fingers will play 3 - 2 - 1 or G - B - E. The index finger will play G (or the third string), middle finger B (or the second string), and the ring finger E (or the first string).
  2. If fingerpicking is something new for you, then you may want to practice on open strings. The reason for open strings is it allows you to focus on the right hand without having to be concerned with chord changes.
  3. Rest your right hand thumb on the 6th string for support as you practice plucking the strings.
  4. Pluck the 3rd string G with the index finger following through toward the palm. Practice avoiding hitting the 4th string. Do the same with the middle finger playing the 2nd string B. Followed by the ring finger playing the 1st string E.
  5. Let the fingers follow through 'in their lanes'. Remember to pluck toward the palm and not outward away from the face of the guitar.
  6. In measure 2 and throughout the piece you will see 4 note chords. They are to be played with thumb, index, middle, ring simultaneously on the beat.

Of course, an exhaustive study of right hand technique is beyond the scope of this presentation. However, I hope that I did my best to help you get started in the right direction. If you are interested in fingerpicking, you may visit my web site at pappasmusic.com and I'll give you some suggestions of methods, exercises, etc. to help further your study. I hope you have fun learning and playing this arrangement. That's what this is all about.

Steve Pappas is a guitarist, composer and teacher from Ohio specializing in fingerstyle guitar who believes in daily practice, and expressing emotions and feelings through his playing.

His latest CD is entitled "Refuge", a blend of Folk, Spanish, Classical, Latin and Rock influences.

Steve Pappas